Мы надеемся что Вы уже знакомые с конструкцией стандартной J-антенны, так что не будем вникать в ненужные подробности. Предлагаемая антенна является разновидностью J-антенны и может с большим успехом применяться на один, два, три и более диапазонов. Питание данной антенны может осуществляться как от отдельных кабелей для каждого диапазона, так и одним кабелем, правда первый вариант наиболее предпочтителен.
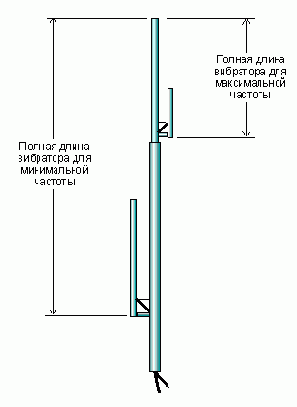
В конструкции антенны нет никакой хитрости, только не забывайте, что полная длина антенны определяется самой низкой рабочей частотой. Другими словами, если Вы используете антенну на 144, 430 и 900 МГц, то общая длина излучателя будет соответствовать длине антенны 2-х метрового диапазона, т.е. около 150 см.
Коаксиальные кабели пропускаются внутри центрального штыря к соответствующим элементам. Между элементами антенны используются Т-образные стыки. Проблема при конструировании антенны состоит в том, что чем больше диапазонов Вы используете, тем труднее обеспечить равномерность SWR на всех диапазонах.
Ниже приведена таблица размеров антенны для некоторых диапазонов.
Частота
52 MHz
146 MHz
223.5 MHz
435 MHz
912 MHz
912 MHz
Диаметр вибратора (мм)
25
18
12
12
9
9
Длина шлейфа (мм)
1367
484
316
161
75
54
Общая длина (мм)
4098
1452
948
485
227
162
Расстояние между вибратором и шлейфом (мм)
125
50
25
18
12
6
Точки включения кабеля (мм)
150
60
37
25
18
12
Для лучшего результата, сначала изготовьте самый высокочастотный вибратор, например для диапазона 435 Мгц. Вибратор изготавливается из медной трубки диаметром 9 мм, согласующая линия - из медной 6-мм трубки. Конечно, конечный продукт будет в форме "J". Теперь изготовим элементы следующего диапазона, например на 223.5 MHz, добавляя трубку на T-соединителе, который является базовым креплением 435 MHz антенны. Мы использовали 12 мм трубку для вертикального излучателя и 12 мм для шлейфа этой секции. Теперь изготовьте 146 MHz антенну, не забудьте что полная длина антенны - самая низкая частота которую вы будете использовать. Мы используем 18 мм трубку для вертикального излучателя и 12 мм для шлейфа. Шлейф должен быть параллелен вертикальному излучателю, но он может располагаться с любой стороны относительно вертикальной оси. Мы предпочитаем размещать их на попарно противоположных сторонах, но вы можете делать их все с одной стороны, если хотите. Окончательно внешний вид такой антенны напоминает кактус, окуда и ее название.
Последнее примечание: Если вы используете 12 мм трубку для всей конструкции, на 2-метровом шлейфе добавьте 6 мм к длине, чтобы можно было произвести подстройку. Изготовленная антенна после настройки имеет SWR не хуже 1.2-1 на всех диапазонах при условии, что для каждого диапазона используется свой питающий кабель.
Спаяйте все элементы перед установкой коаксиального кабеля. Чтобы установить кабели просверлите отверстия диаметром 6 мм в верхей части горизонтального элемента Т-соединителя ближе к вертикальной части (в углу) и просуньте через них кабели.
Наслаждайтесь результатом! И еще одно: вначале, пока Вы не освоили изготовление такой антенны, не делайте более трех диапазонов на одном вибраторе.
Использование одного кабеля для питания многодиапазонной антенны (К сожалению, пока только на английском).
Single Coax Feed to Multi-Band Copper Cactus Antenna.
There are three connection possibilities to feed the multi-band copper cactus antenna with a single feedline or coax. However, it is imperative that you use the proper coax for the highest band of operation, RG58 just won't cut it and even RG8 in lengths longer than 25 feet is marginal in 440 operation.
For all single coax feeding methods, the antenna will require re-tuning to obtain the lowest SWR for each band. This is accomplished by installing in the pipe cap of the tuning stub on each band of operation a brass machine screw of at least 2 inches in length vertical out of the cap.
The first and simplest connection method, albeit the hardest to tune, requires that you place a shorting wire on all but the lowest band of operation. If you are building your antenna from the N0ZOI (now KG0ZP) plans for "The Copper Cactus Antenna" and for example building a tri-bander for the frequencies of 144, 220 & 440 MHz, the shorting wires should be placed between the normal connect points for the shield and center conductor of each band. The 440 band shorting wire should be placed exactly 1 inch above the top of the horizontal pipe of the 440 tuning stub, the 220 band shorting wire should be placed exactly 1-1/2 inches above the horizontal pipe of the 220 tuning stub and your coax suitable for 440 operation should be connected exactly 2-1/4 inches above the horizontal pipe of the 144 tuning stub with the center of the coax going to the main vertical and the shield to the tuning stub (this is just the reverse of the connections shown on the plans and in the methods below), keeping the center conductor length as short as possible. For best results, tune the antenna from the highest band to the lowest, however, using the shorting method does create quite a bit of interaction.
The second method is easier to tune than the first method, but does require placing 1/4 or 1/2 wavelength matching sections for all the bands of operation. If you are building a dual band antenna, the use of a T-Connector simplifies the project. Please bear in mind that you cannot use a 1/4 wavelength matching section on one band and a 1/2 wavelength matching section on another band, plus each band of operation requires the use of a matching section, including your lowest band of operation. Unfortunately, the connections will be inside the vertical section, a feat not easy to accomplish, but it does make tune-up much faster and easier than the shorting strap method shown above. The center connector of the coax matching sections is affixed to the tuning stub and the shield to the vertical section, keeping the center conductor length lead as short as possible.
The third method requires no antenna re-tuning from the specifications given on the plans and random length pieces of coax may be used. However, a relay switching assembly must be constructed inside a weathertight enclosure or the use of a duplexer for dual-band operation or tri-plexer for tri-band operation can be utilized. As above, the center conductor of the coax goes to the tuning stub and the shield to the vertical. I will note that I have used random length coax, without *-plexers or relay assemblies, however, this method worked on only three of five duplicate antennas using the same random length pieces of coax on each. Each band showed an SWR of less than 1.025 to 1 until connected together, then two of the antennas showed an SWR of over 3 to 1 and three antennas were less than 1.8 to 1 across all bands without re-tuning. A little re-tuning brought the SWR down to below 1.2 to 1 on two of the antennas, but we could not acheive anything lower than the original 1.8 to 1 on the third. So if you use random length coax and no relays or *-plexers, good luck.
NOTE: The connect distance above the horizontal member on each band is selected for an impedance of around 50 ohms, moving the connect point up or down from this set point can and will increase the impedance as high as 650 ohms within a distance of 1/2 inch either side of the established proper connect point.